Orange Pi H3 WiringOP GPIO Guide
1️⃣ Install WiringOP for Orange Pi H3
Step 1: Update your system
bash
sudo apt update
sudo apt upgrade -y
Step 2: Install required packages
bash
sudo apt install git build-essential -y
Step 3: Clone WiringOP repository
bash
git clone https://github.com/zhaolei/WiringOP
cd WiringOP
Step 4: Compile and install
bash
chmod +x ./build
sudo ./build
Step 5: Test installation
bash
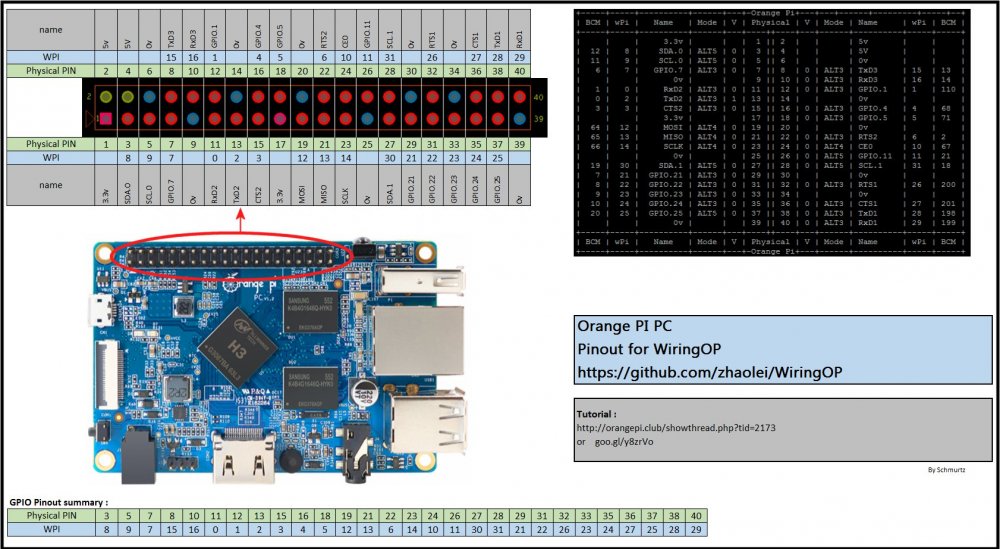
gpio -v      # Shows WiringOP version
gpio readall # Displays all pins and modes
2️⃣ Understand GPIO Pin Modes
| Mode | Description | Example Use |
|---|---|---|
out | Pin acts as output | LED, relay |
in | Pin acts as input | Button, sensor |
up | Enable pull-up resistor | Keeps input HIGH by default |
down | Enable pull-down resistor | Keeps input LOW by default |
3️⃣ Wiring Components
LED
- Positive (long leg) → GPIO pin (e.g., 7)
- Negative (short leg) → Ground (pin 6 or 14)
Button
- One side → GPIO pin (e.g., 0 / physical pin 11)
- Other side → Ground (pin 6 or 14)
- Optional: Enable pull-up resistor with
gpio mode <pin> up
4️⃣ Setup Pins in WiringOP
Step 1: Configure LED as Output
bash
gpio mode 7 out
gpio write 7 0   # LED OFF initially
Step 2: Configure Button as Input with Pull-up
bash
gpio mode 0 in
gpio mode 0 up
Button reads 1 when released, 0 when pressed
5️⃣ Test LED and Button
LED
bash
gpio write 7 1   # LED ON
gpio write 7 0   # LED OFF
Button
bash
gpio read 0 # Press → 0, Release → 1
6️⃣ Advanced Button Events (Single, Double, Long Press)
Create a Bash script (gpio-button-events.sh) to detect:
- Single click → LED ON
- Double click → LED OFF
- Long press (>2s) → Blink LED 3 times
Example snippet inside script:
bash
# LED Pin and Button Pin\LED=7
BUTTON=0

# Setup
gpio mode $LED out
gpio write $LED 0
gpio mode $BUTTON in
gpio mode $BUTTON up

# Implement event detection with timing logic using gpio read
Run the script:
bash
./gpio-button-events.sh
7️⃣ Programming Pins in Orange Pi H3
You can program GPIO pins using:
Bash (Command Line)
- Set pin mode:
gpio mode <pin> in|out|up|down - Write output:
gpio write <pin> 1|0 - Read input:
gpio read <pin>
Python (with WiringOP-Python)
python
import wiringpi

wiringpi.wiringPiSetup()
LED = 7
wiringpi.pinMode(LED, 1)  # 1 = OUTPUT
wiringpi.digitalWrite(LED, 1)  # Turn LED ON
Java
- Use
ProcessBuilderto execute WiringOP CLI commands:
java
ProcessBuilder pb = new ProcessBuilder("gpio", "write", "7", "1");
pb.start();
8️⃣ Notes & Tips
- Always set pin mode before using the pin.
- Poll buttons at ~50ms intervals for responsiveness.
- Pull-up resistors prevent floating inputs.
- Use
gpio readallto check current pin states. - Combine Bash or Python scripts for LED and button events.
✅ Your Orange Pi H3 is now ready for GPIO projects!